Wrought Iron Corbel Buying Guide
This page has been built to help answer any questions you might have about wrought iron corbels, from Uses and Ideas to installation instructions we have you covered. Learn more by clicking on the links below.
Welcome to the Iron Corbel Uses and Idea Gallery
Iron Corbels have hundreds of uses in your home or office. These heavy-duty brackets provide physical support, while also serving a decorative purpose. They are extremely versatile and can be used in a variety of places, from supporting your granite kitchen counter top overhangs and cabinetry to providing decorative shelving and mantel support. Below you can see a number of different use ideas submitted my customers who have used their corbels for just about everything.
Iron Corbel Location Uses and Ideas Gallery
Corbel Brackets for Counter Top Overhangs
Using corbels to support granite or any natural stone overhang is one of the most common uses for Wrought Iron Corbels. They add an upscale visual element to an often-unused space and blend nicely in a modern kitchen full of marble, stainless steel and high-quality wood. As you can see in these photos, they provide plenty of support and look great too.


Decorative Shelving Brackets
Wrought iron Brackets are regularly used to support shelves of all kinds, from book shelves to pantry shelves our decorative brackets do all the heavy lifting while adding just the right amount of decorative accent. The combination of wood and wrought iron is exquisite and many corbel designs such as the tree-like design in the picture below, offer a natural flow through the entire structure.

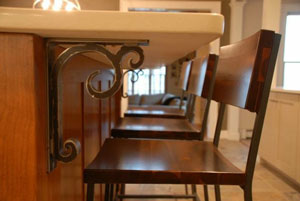
Bar support brackets
Bars with overhangs are always in need of both support and decorative elements, which is exactly where wrought iron corbels come into play. Corbels help support the multitude of drinks and leaning elbows the put pressure on the overhang, while also breaking up the monotony of the area below your bar.
Cabinet supports
With the amount of heavy dishes tucked inside upper-level cabinets, they often appear precariously unstable. Wrought iron corbels can be utilized to support these cabinets and provide an attractive visual element in the process. Wrought iron corbels look amazing with both light and dark wood cabinets and can take up less space than thicker wooden ones.
Fireplace Mantel Support
Wrought iron corbels look incredible beneath fireplace mantels because they match other nearby metal elements, such as fireplace tool sets, fireplace screens and fireplace grates. They're also extremely strong, which is very important considering the weight needed to support large fireplace mantels.
If your are looking for iron fireplace tools, screens and more we have a variety of quality iron Fireplace and Hearth Accessories, click here to shop fireplace and hearth now.

Go to Top of Page
Welcome to the Iron Corbel Style Guide
Corbels are available in many different styles, shapes and sizes. Our wrought iron corbels are pretty universal and fit into any home decor style, so the biggest decision you have to make is picking a design you like. To help you make a decision on design, we put together this style guide that breaks them down by category.
Corbel Style Guide
Rustic Style Corbels
Boasting a natural look as though it were born of Mother Nature, the rustic style iron corbels have tree-like limbs or simple patterns. They look great in rural and country homes, but also meld beautifully in modern settings where wood is a common material.
The Willow, Cooper and Torches Wrought Iron Corbels are a few of the most popular rustic versions.


Modern Style Corbels
The range of styles for modern iron corbels is quite varied, from the Russell Wrought Iron Corbel that looks like a metal chain to the Tao Wrought Iron Corbel that has an almost zen aura about it. If you have a unique modern style in your house decor, a modern iron corbel can be a great fit.


Traditional Style Corbels
The traditional iron corbel features a distinct scroll pattern, often looking like an upside-down ampersand. The design is both elegant and practical, giving your eye something beautiful to look at while lending support as it is made to do. Scrolls range from simplistic to intricate and each one has a different pattern, meaning you have lots of great choices when it comes to traditional iron corbels. The Isabelle and Classic Scroll Wrought Iron Corbel is one of the most popular traditional styles.


Contemporary Style Corbels
The contemporary style corbels are clean and simple brackets that offer a blend of function and simple style. They often feature a simple straight line or a simple curve that connects the upper and lower brackets (L bracket). We offer a few contemporary iron corbels including the Eclipse, Portland and Stout Iron Corbels.


Industrial Style Brackets
This style of bracket is popular in industrial lofts, studio apartments and industrial inspired architecture. Our most popular corbel in this category is our Industrial Pipe Bracket which has the rugged look of industry all over it, its very masculine come to think of it.

Transitional Style Corbels
Transitional style is a combination of traditional and contemporary furnishings that give your home a timeless look. Nearly all of our corbels could fit into this category but which ones you choose comes down to preference or personal taste. A Transitional iron corbel is not too cold, not too formal, not too fussy. Here are a couple of linked examples of Transitional Style Corbels.
Iron Corbel Installation Guide
The installation of corbels will differ based on the application and mounting surface. This guide helps explain the process of installing your wrought iron corbels on a variety of surfaces. Please read thoroughly and ask us if you have any questions.
How to install iron corbels over wood?
Tools: Please make sure you have the following tools handy before you begin -
- Level
- Tape measure
- Pencil
- Drill
- Drill Bit
- Screws
- Decide on the position on the wooden surface where you want to install the corbel and hold it in place.
- Now, using a pencil/black sharpie, mark the positions of the screw holes on the wood. Make sure you get a mark corresponding to the middle of each hole.
- Choose appropriate screws to mount the corbel according to the size of the screw holes.
- Choose a drill bit that's slightly smaller than your screw and drill holes into the wood.
- Mount the Corbel using the screws.
How to install iron corbels over drywall?
Tools: Please make sure you have the following tools handy before you begin -
- Level
- Tape measure
- Pencil
- Drill
- Drill bit
- 2" Toggle bolts
- Using the level, mark the height where you want the top of corbels. Make sure the line is as level as possible and then draw it equal to the length of your shelf. This way you can easily place the corbels where required. When marking the height of the corbels keep in mind that the shelf will sit on top of the corbels so account for the shelf's thickness when deciding the level of the corbel tops.
- Now hold one of the corbels up to the line where it is to be installed. Keeping the corbel's top plate level with the line, mark the corbel holes with a pencil.
- As suggested earlier, choose a drill bit that is larger than the toggle bolt that you intend to use. To determine the diameter of the toggle bolt, screw on the toggle bolt flaps and note the diameter after pinching the flaps together.
- Once you have marked the holes, drive a small nail (1.5") into each hole to check if you are going to encounter a stud. In case you don't hit a stud, go ahead and use a toggle bolt for that particular hole.
- On the other hand, if you do encounter a stud when driving a nail through the marks, then you should use a regular screw instead, with a similar head design as the toggle bolt. In case you have three holes available and one requires a toggle bolt, make sure all three bolts have matching heads.
- For the hole where the nail doesn't encounter any studs, drill the hole into the drywall. Now pass the toggle bolt into the corbel hole. Once it's through the corbel hole, screw the flap on the edge of the toggle bolt and leave only a few threads on the bolt's end.
- Now holding the corbel up to match the holes in the drywall, push the toggle bolt through the drywall hole. Once the bolt passes through to the other side and the flaps open up, push up the corbel to flush where it will stay once tightened.
- Initially, use your hand to tighten the toggle bolt as much as possible. Once you can't tighten it anymore with your hand, use a drill or screwdriver to completely tighten it.
- Tighten any regular screws that you may have used in the installation.

How to install iron corbels over brick?
Tools: Please make sure you have the following tools handy before you begin -
- Tapcon masonry screws
- Hammer Drill (or, one with hammer drill setting)
- Masonry Drill bit (usually comes with TapCon screws)
- Black sharpie
- Wood screws (if applicable)
- Determine the position and height of the Corbels.
- Using a black sharpie, mark the spots where the corbel holes match up on the brick wall.
- Choose the appropriately sized masonry drill bit that is suitable for your tapcon screws. In most cases, tapcon screws come with a drill bit. It is recommended to use the accompanying bit wherever possible.

- When drilling the holes into the brick, make sure you drill a very straight bore. Drill the top two holes first and slightly angle the drill from the outside in. The hole should be as deep as the screw for a secure fit.
- You may want to get assistance when mounting the corbel and screwing in the tapcon screw. Be careful to screw it in slowly so that you don't strip out the hole once the screw is tight. Should this happen, you'll have to move the corbel to a different position to install it.
How to install iron corbels over stone?
- Always remember that the corbels have to be installed on a flat surface. This means that the corbels will need to be installed before you lay the rock on the fireplace /bar area
- It is imperative that you know the depth of the rock /stone you'll be using. The corbels need to be flush with the rock faces, i.e., the back plate of the corbels should be flush with the rock/stone faces
- You will also need to put up a wooden back-brace in order to install the corbel. This back-brace will be mounted before the stone/rock work, and the stone will be laid around the corbel once it is screwed into place on the back-brace. The thickness of the wooden back-brace should match the depth of the rock. If the stone/rock is 4" deep, you'll require 2-2x4's placed behind the corbel.
- The back-braces should be cut to the same size as the back plate of the corbels
- Once the back-braces are in place, you can screw on the corbels by following the instructions above for wooden surfaces
- Now that the corbels are installed, you can move on to the stonework.
We hope you find this information helpful, if you have any questions about installing your bracket(s) please feel free to give our experts a call or send us an email we are always here to help.
Also, if you still haven't purchased your wrought iron corbels yet please click here.